How to Install a Hanging Transparent LED Screen
One of the most common questions we receive from retail customers is:
“How do I assemble a large hanging transparent LED display?”
Unlike small transparent LED banners, large transparent LED screens—such as a hanging 4 × 3 m holographic invisible LED screen—cannot be shipped fully assembled because of transportation limitations.
If you’ve never installed one before, there’s no need to worry. In this guide, we’ll walk you through every step of the process, from assembling the aluminum frame to installing the LED panels and completing the final system check.
Quick Overview: Hanging Transparent LED Display
To help you plan your project, here is a quick summary of the installation sequence:
- Assemble the structural frame (using splices and brackets.)
- Route internal power and data cables (through the frame profiles.
- Hoist the empty frame (to its designated hanging position. )
- Mount the LED mesh modules (systematically from left to right, top to bottom. ) Secure the modules (and snap on adjacent connecting clips.)
- Apply adhesive edge panels (and run a system diagnostics check.)
Tools and Components You’ll Need
Before starting the installation, verify that all components are included.
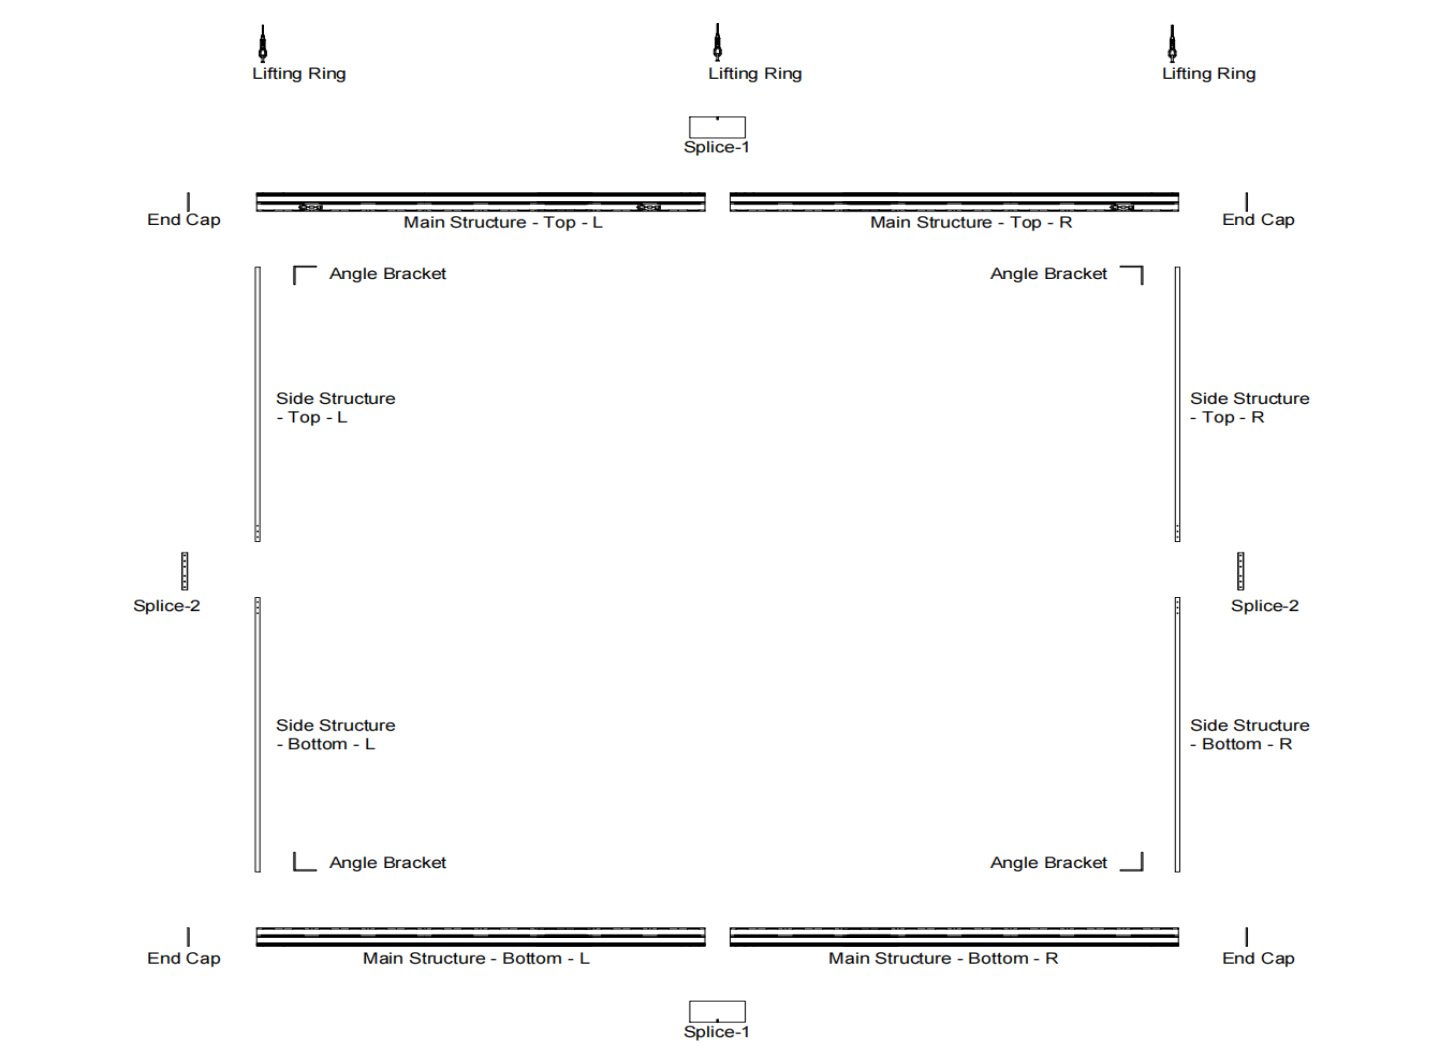
Typical package contents include:
- Aluminum frame structures
- Side frame sections
- LED mesh panels
- Frame splices
- Corner brackets
- Hanging ring
- Power cables
- Ethernet cables
- Panel connection clips
- Mounting screws
- Spare parts and maintenance kit
Keeping every component organized before assembly will significantly reduce installation time.
Step 1. Assemble the Aluminum Frame
Begin by connecting the upper and lower aluminum frame sections using the supplied frame splices.
Next:
- Connect the left and right side structures
- Install all corner brackets
- Tighten the frame screws evenly
- Ensure the frame remains perfectly square
A rigid frame guarantees accurate LED panel alignment later in the installation.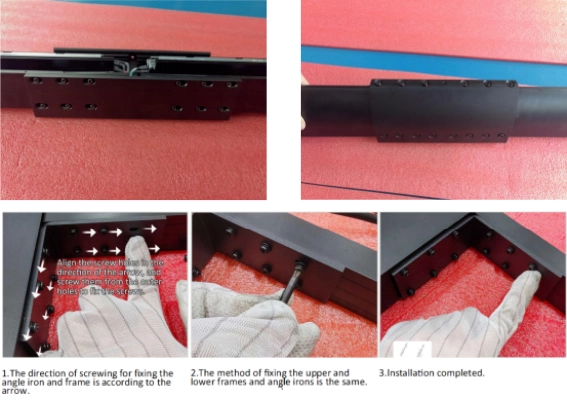
Step 2. Route Power and Data Cables
Before sealing the frame, route all internal wiring. Keeping all power and Ethernet cables hidden for a clean appearance.
During this step:
- Route Ethernet cables through both side structures
- Route power cables alongside them
- Secure all cable connections
Proper cable management not only improves aesthetics but also simplifies future maintenance.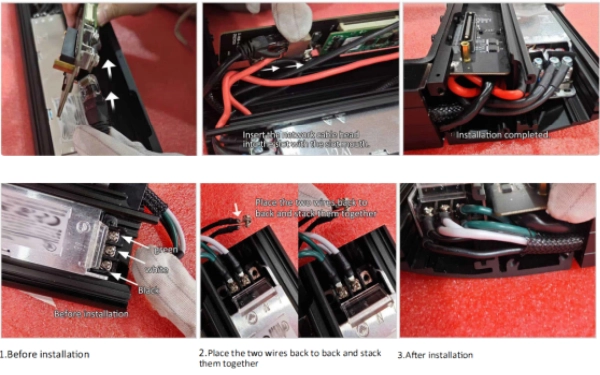
Step 3. Hoist the Frame
Install the supplied lifting rings into the designated mounting positions.
Installation tips:
- Raise the frame carefully
- Verify the hanging position
- Check that the frame remains level
- Tighten all suspension hardware
At this stage, only the aluminum frame is suspended—LED panels should be installed afterward to reduce handling risks.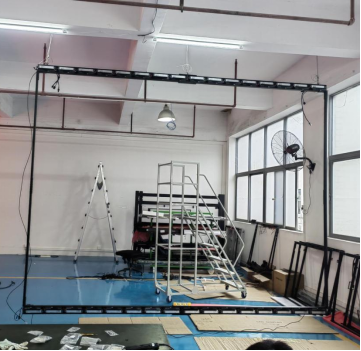
Step 4. Install the Transparent LED Panels
Now comes the most important step.
Install the LED mesh panels from:
Left → Right
and
Top → Bottom
Each panel is clearly labeled for its installation position.
Tips: If the connectors appear dusty or contaminated, use a brush moistened with a PCB cleaning solution (electronic contact cleaner) to clean both the HUB board connector and the LED panel socket before connecting them.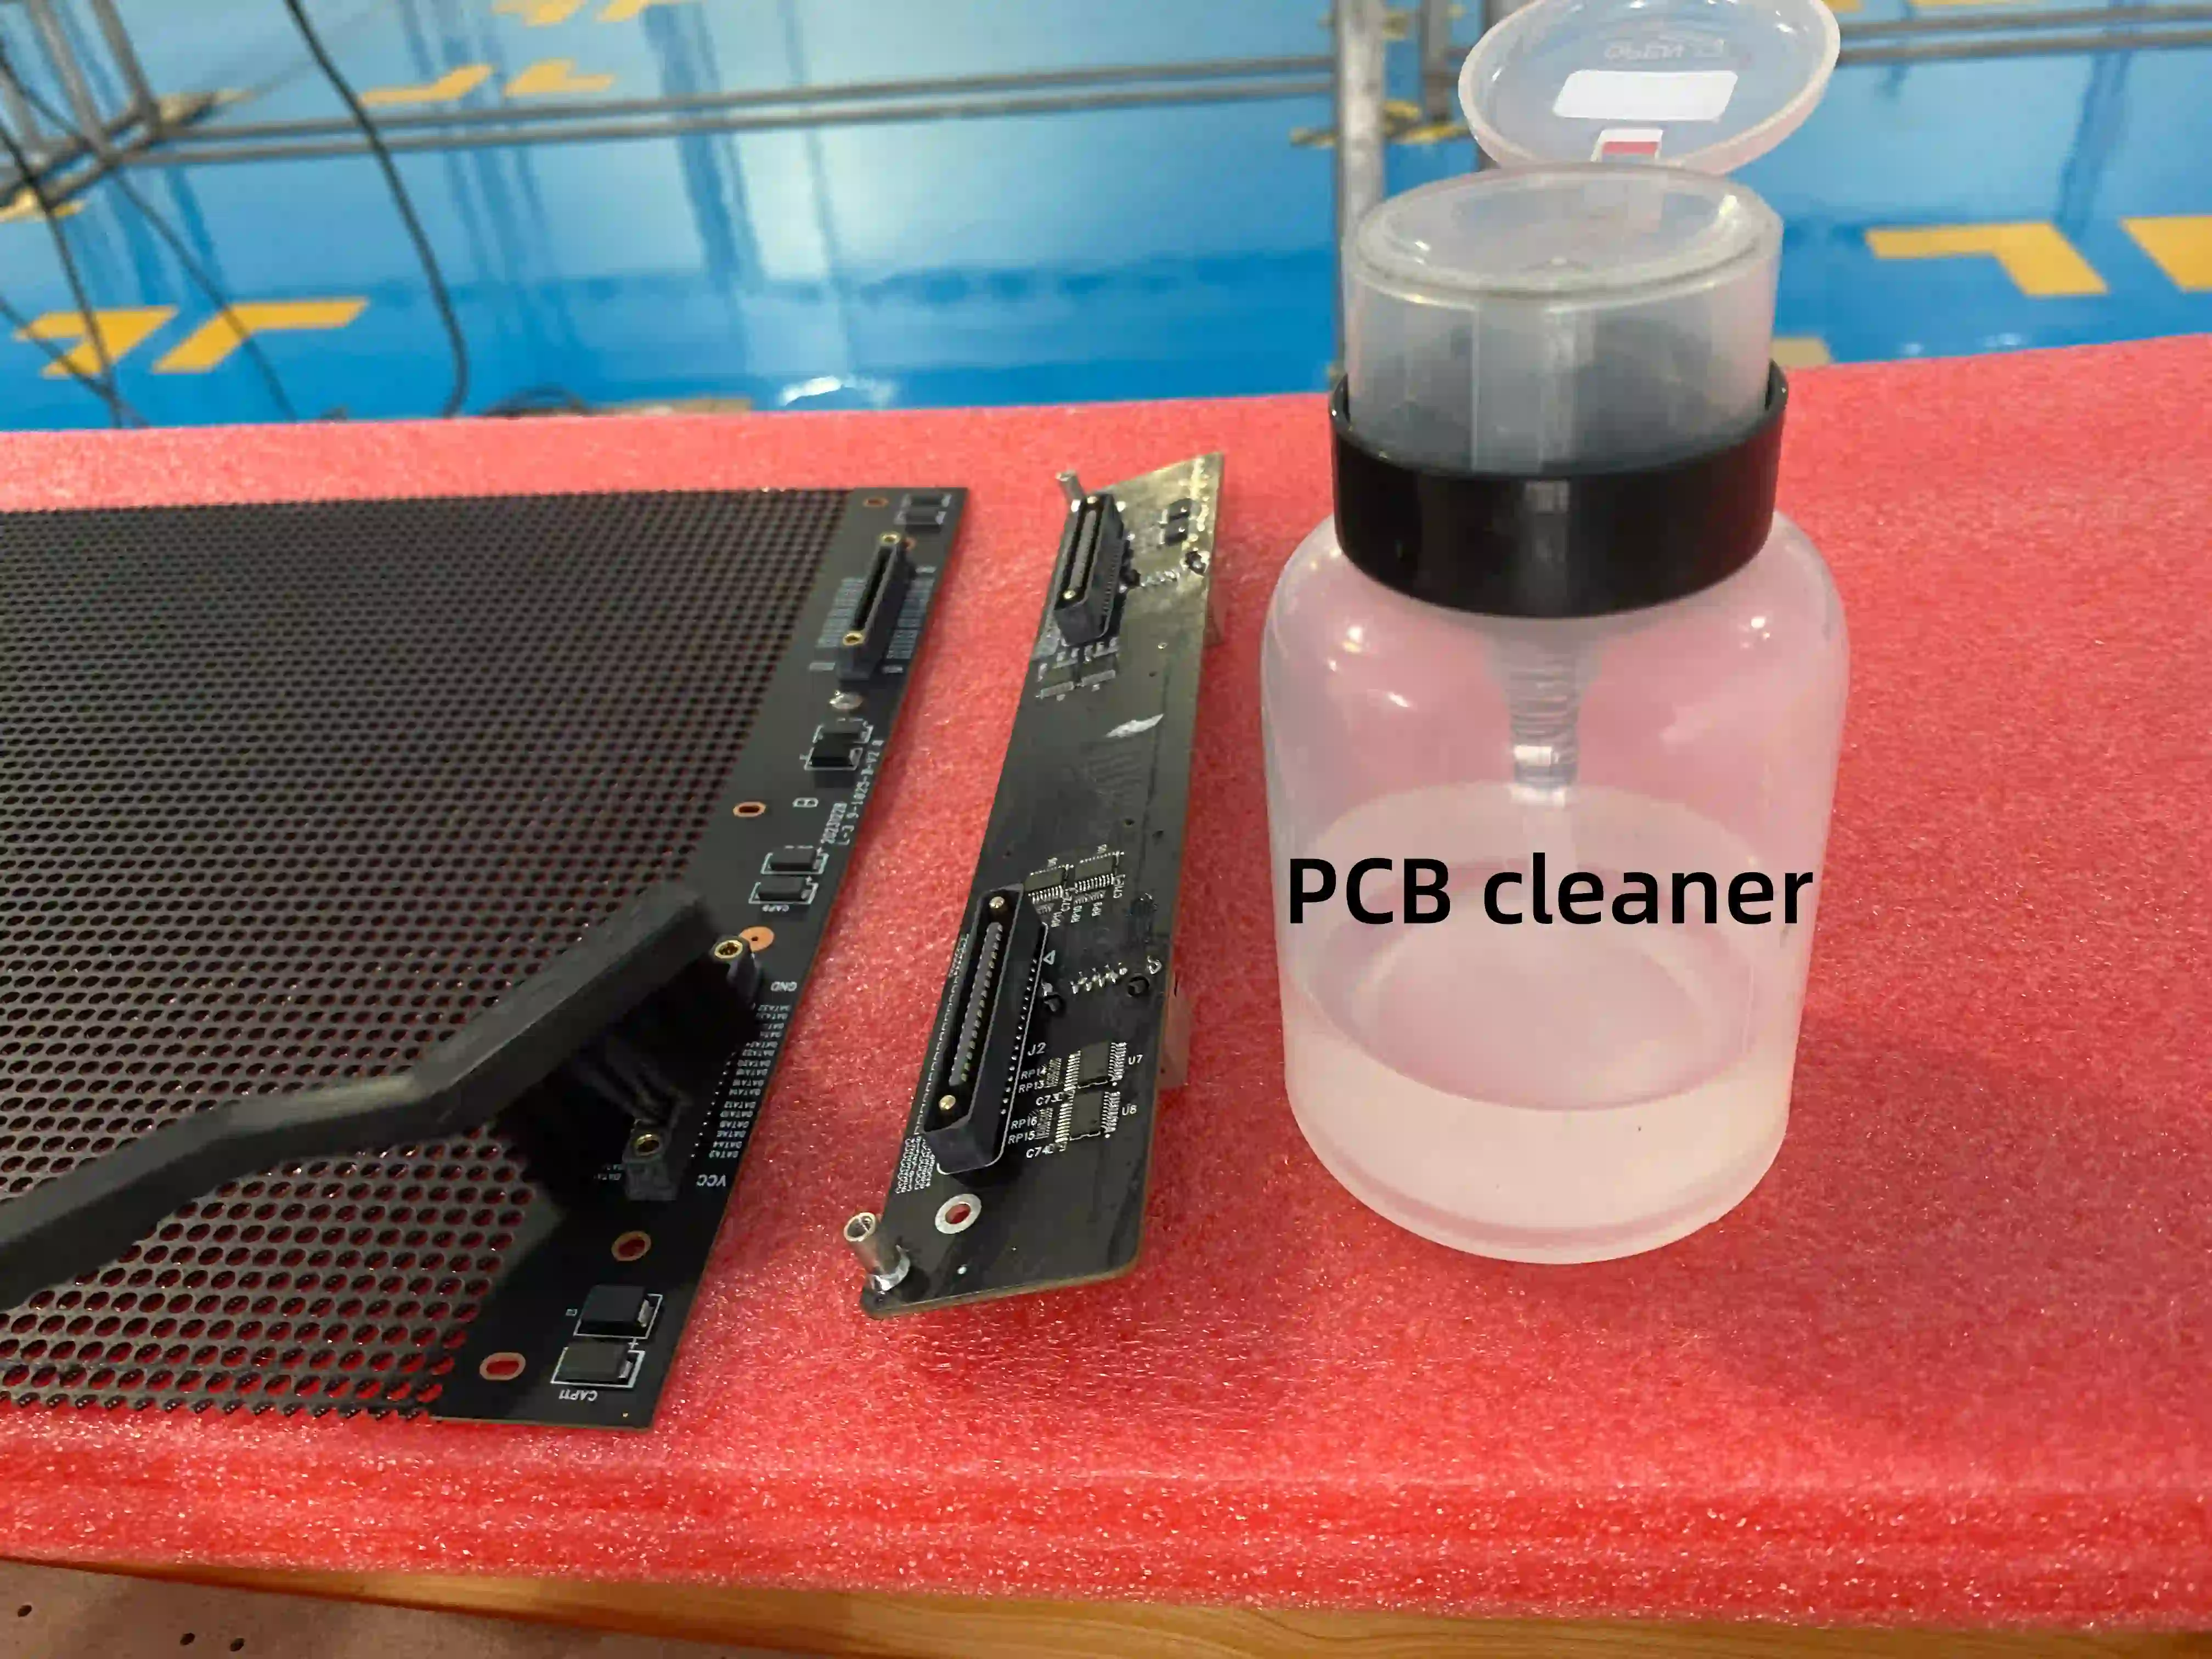
Step 5. Secure Each Panel Properly
Each panel should be fixed by fastening the center screw hole first.
Leave the remaining screws slightly loose during initial positioning to allow fine adjustments.
Once adjacent panels have been connected and aligned:
- Tighten all screws
- Verify panel flatness
- Confirm there are no visible gaps
This method ensures a perfectly seamless visual surface.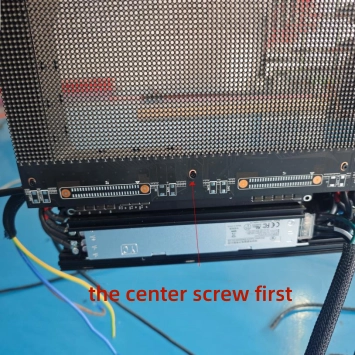
Step 6. Connect Adjacent LED Panels
Adjacent transparent LED panels are connected using specially designed panel clips.
When installing the clips:
- Maintain the specified clip spacing
- Confirm the clip orientation(Do not poke the pins of LEDs)
- Press each clip firmly into place
- Check that every clip is fully locked
After installing each LED panel, immediately install the connecting clips before proceeding to the next panel. This is a critical step that is often overlooked by first-time installers. Once other panels are installed, access to the clip locations becomes restricted, making it difficult to reach them by hand. In some cases, panels may even need to be removed to install the missing clips.
Following a panel-by-panel installation sequence helps ensure proper alignment, secure connections, and a much smoother installation process.
Improperly installed clips may result in short circuits, making this one of the most critical installation steps.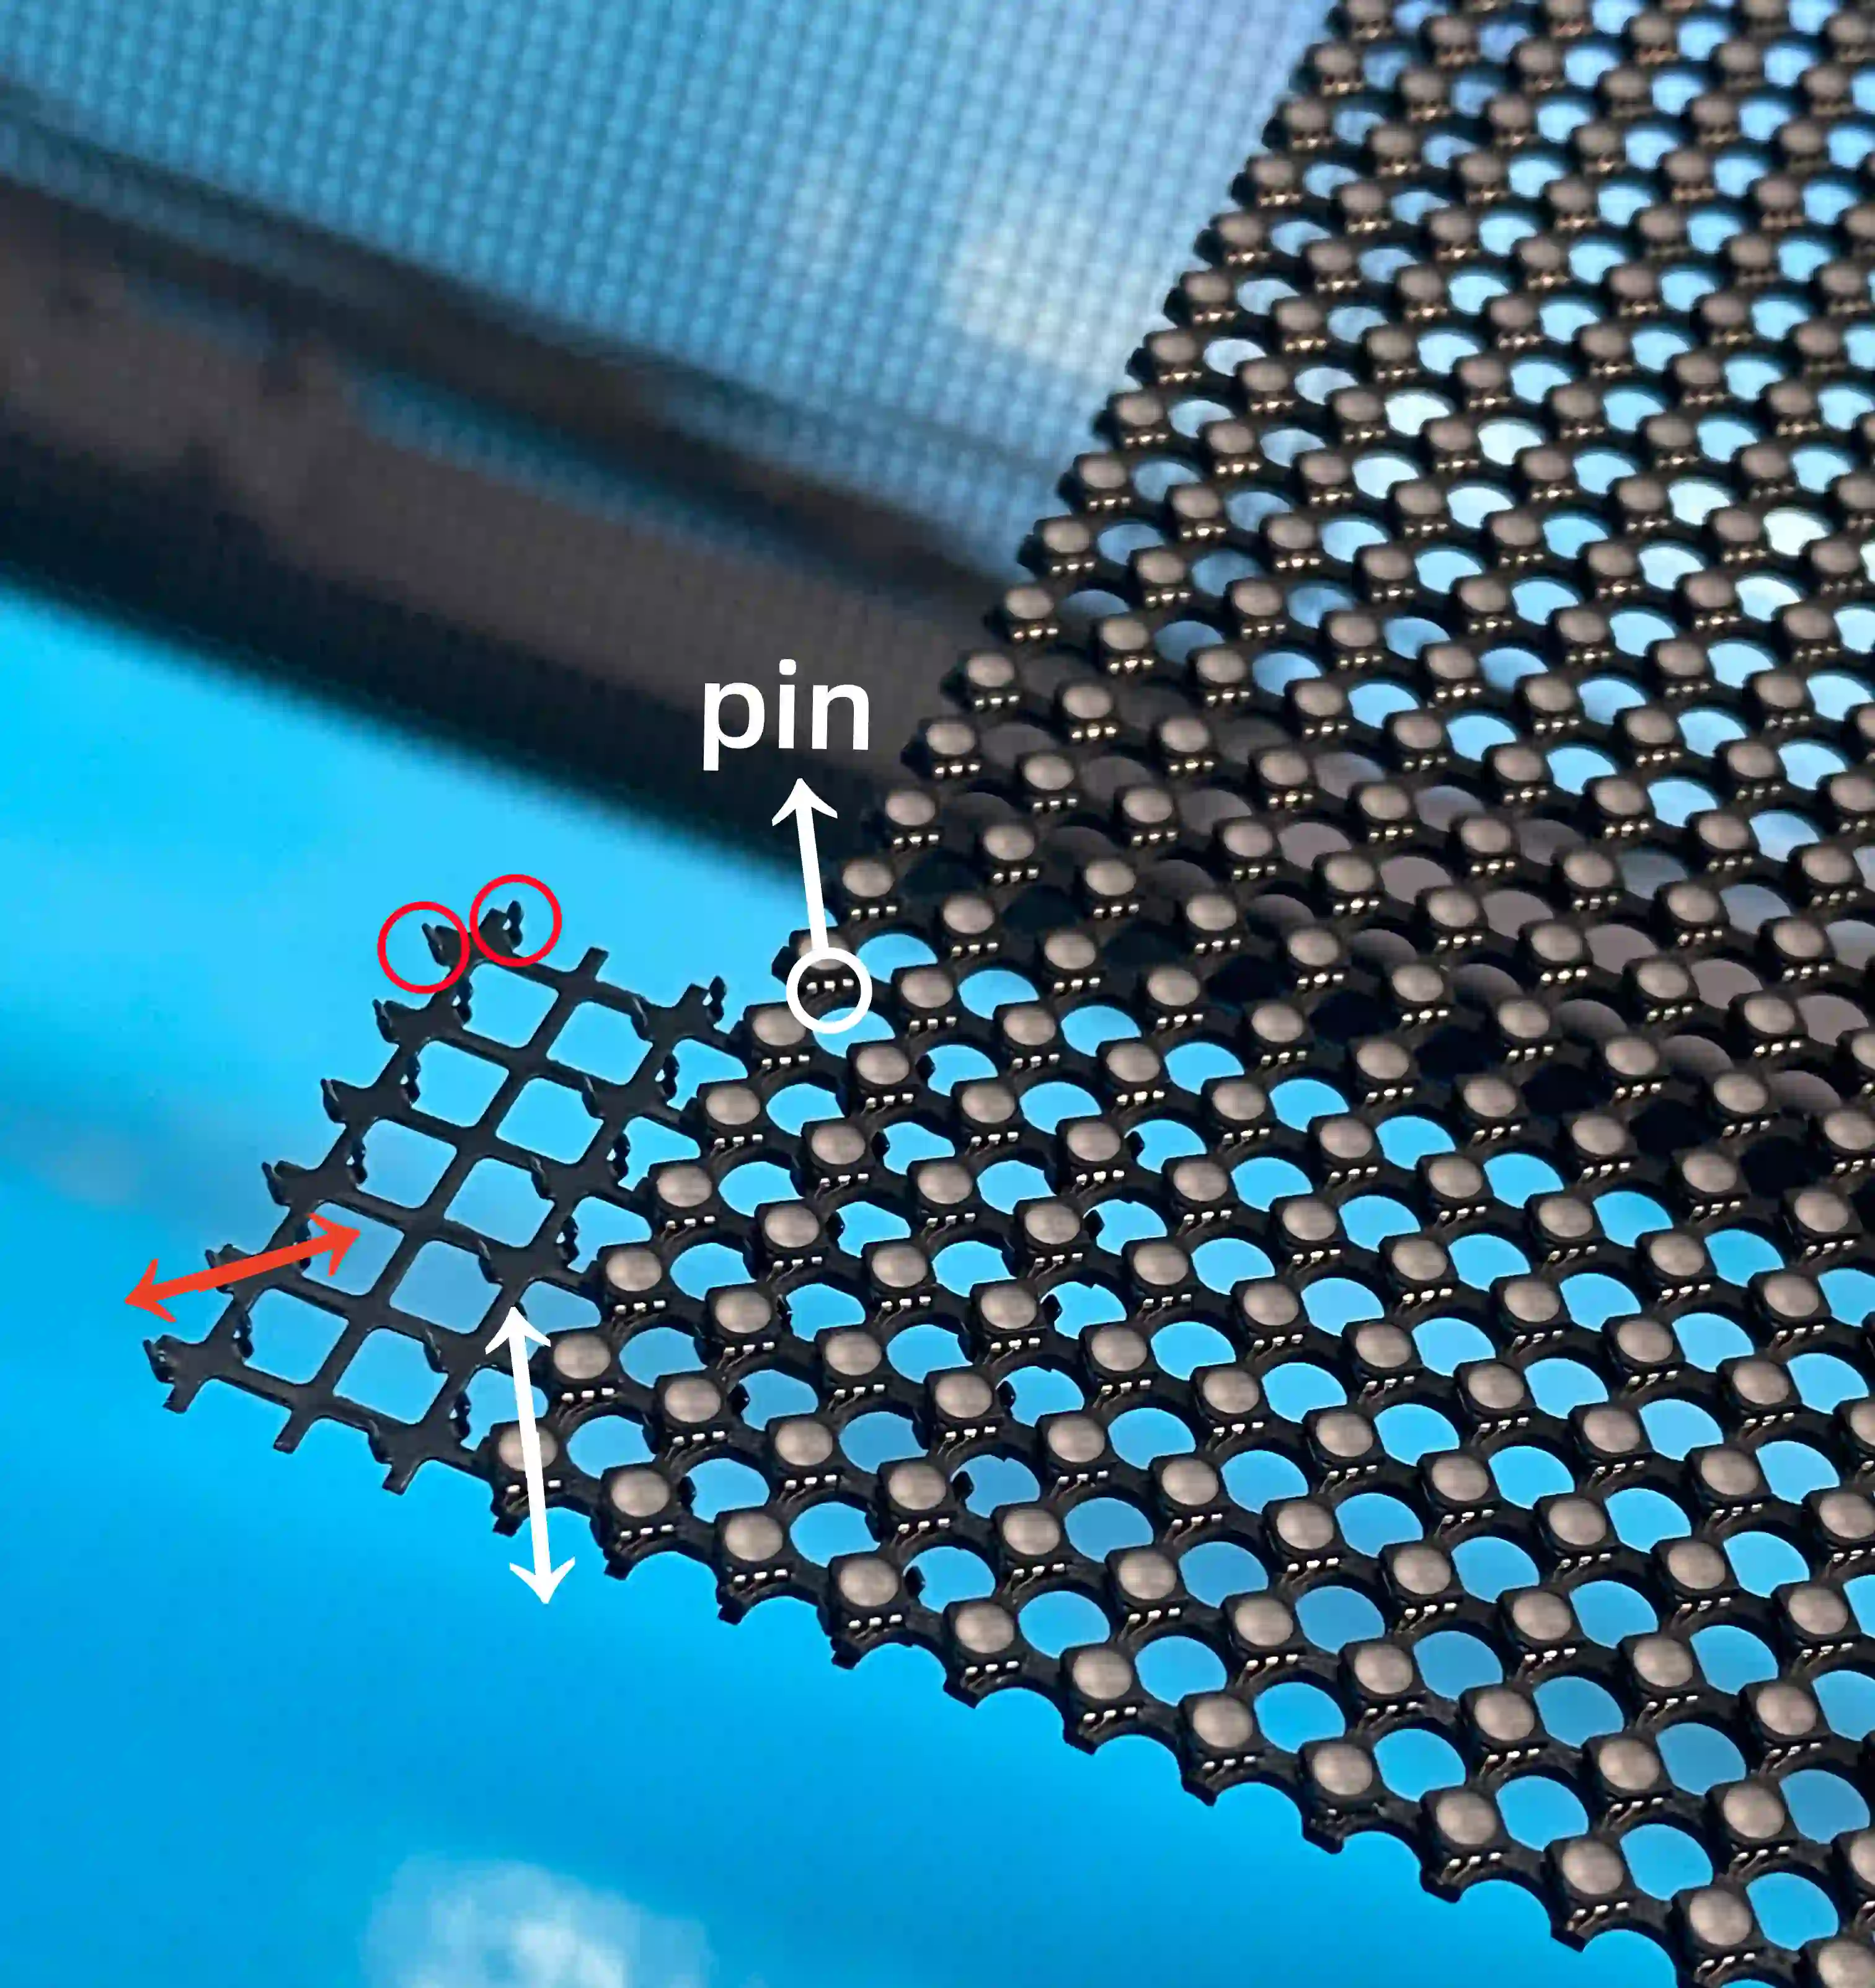
Step 7. Secure the Edge Panels
Several edge panels include pre-applied adhesive backing.
After positioning:
- Remove the protective film
- Press the panel firmly against the side frame
- Ensure complete adhesion
These edge panels improve overall stability while maintaining the display’s clean, frameless appearance.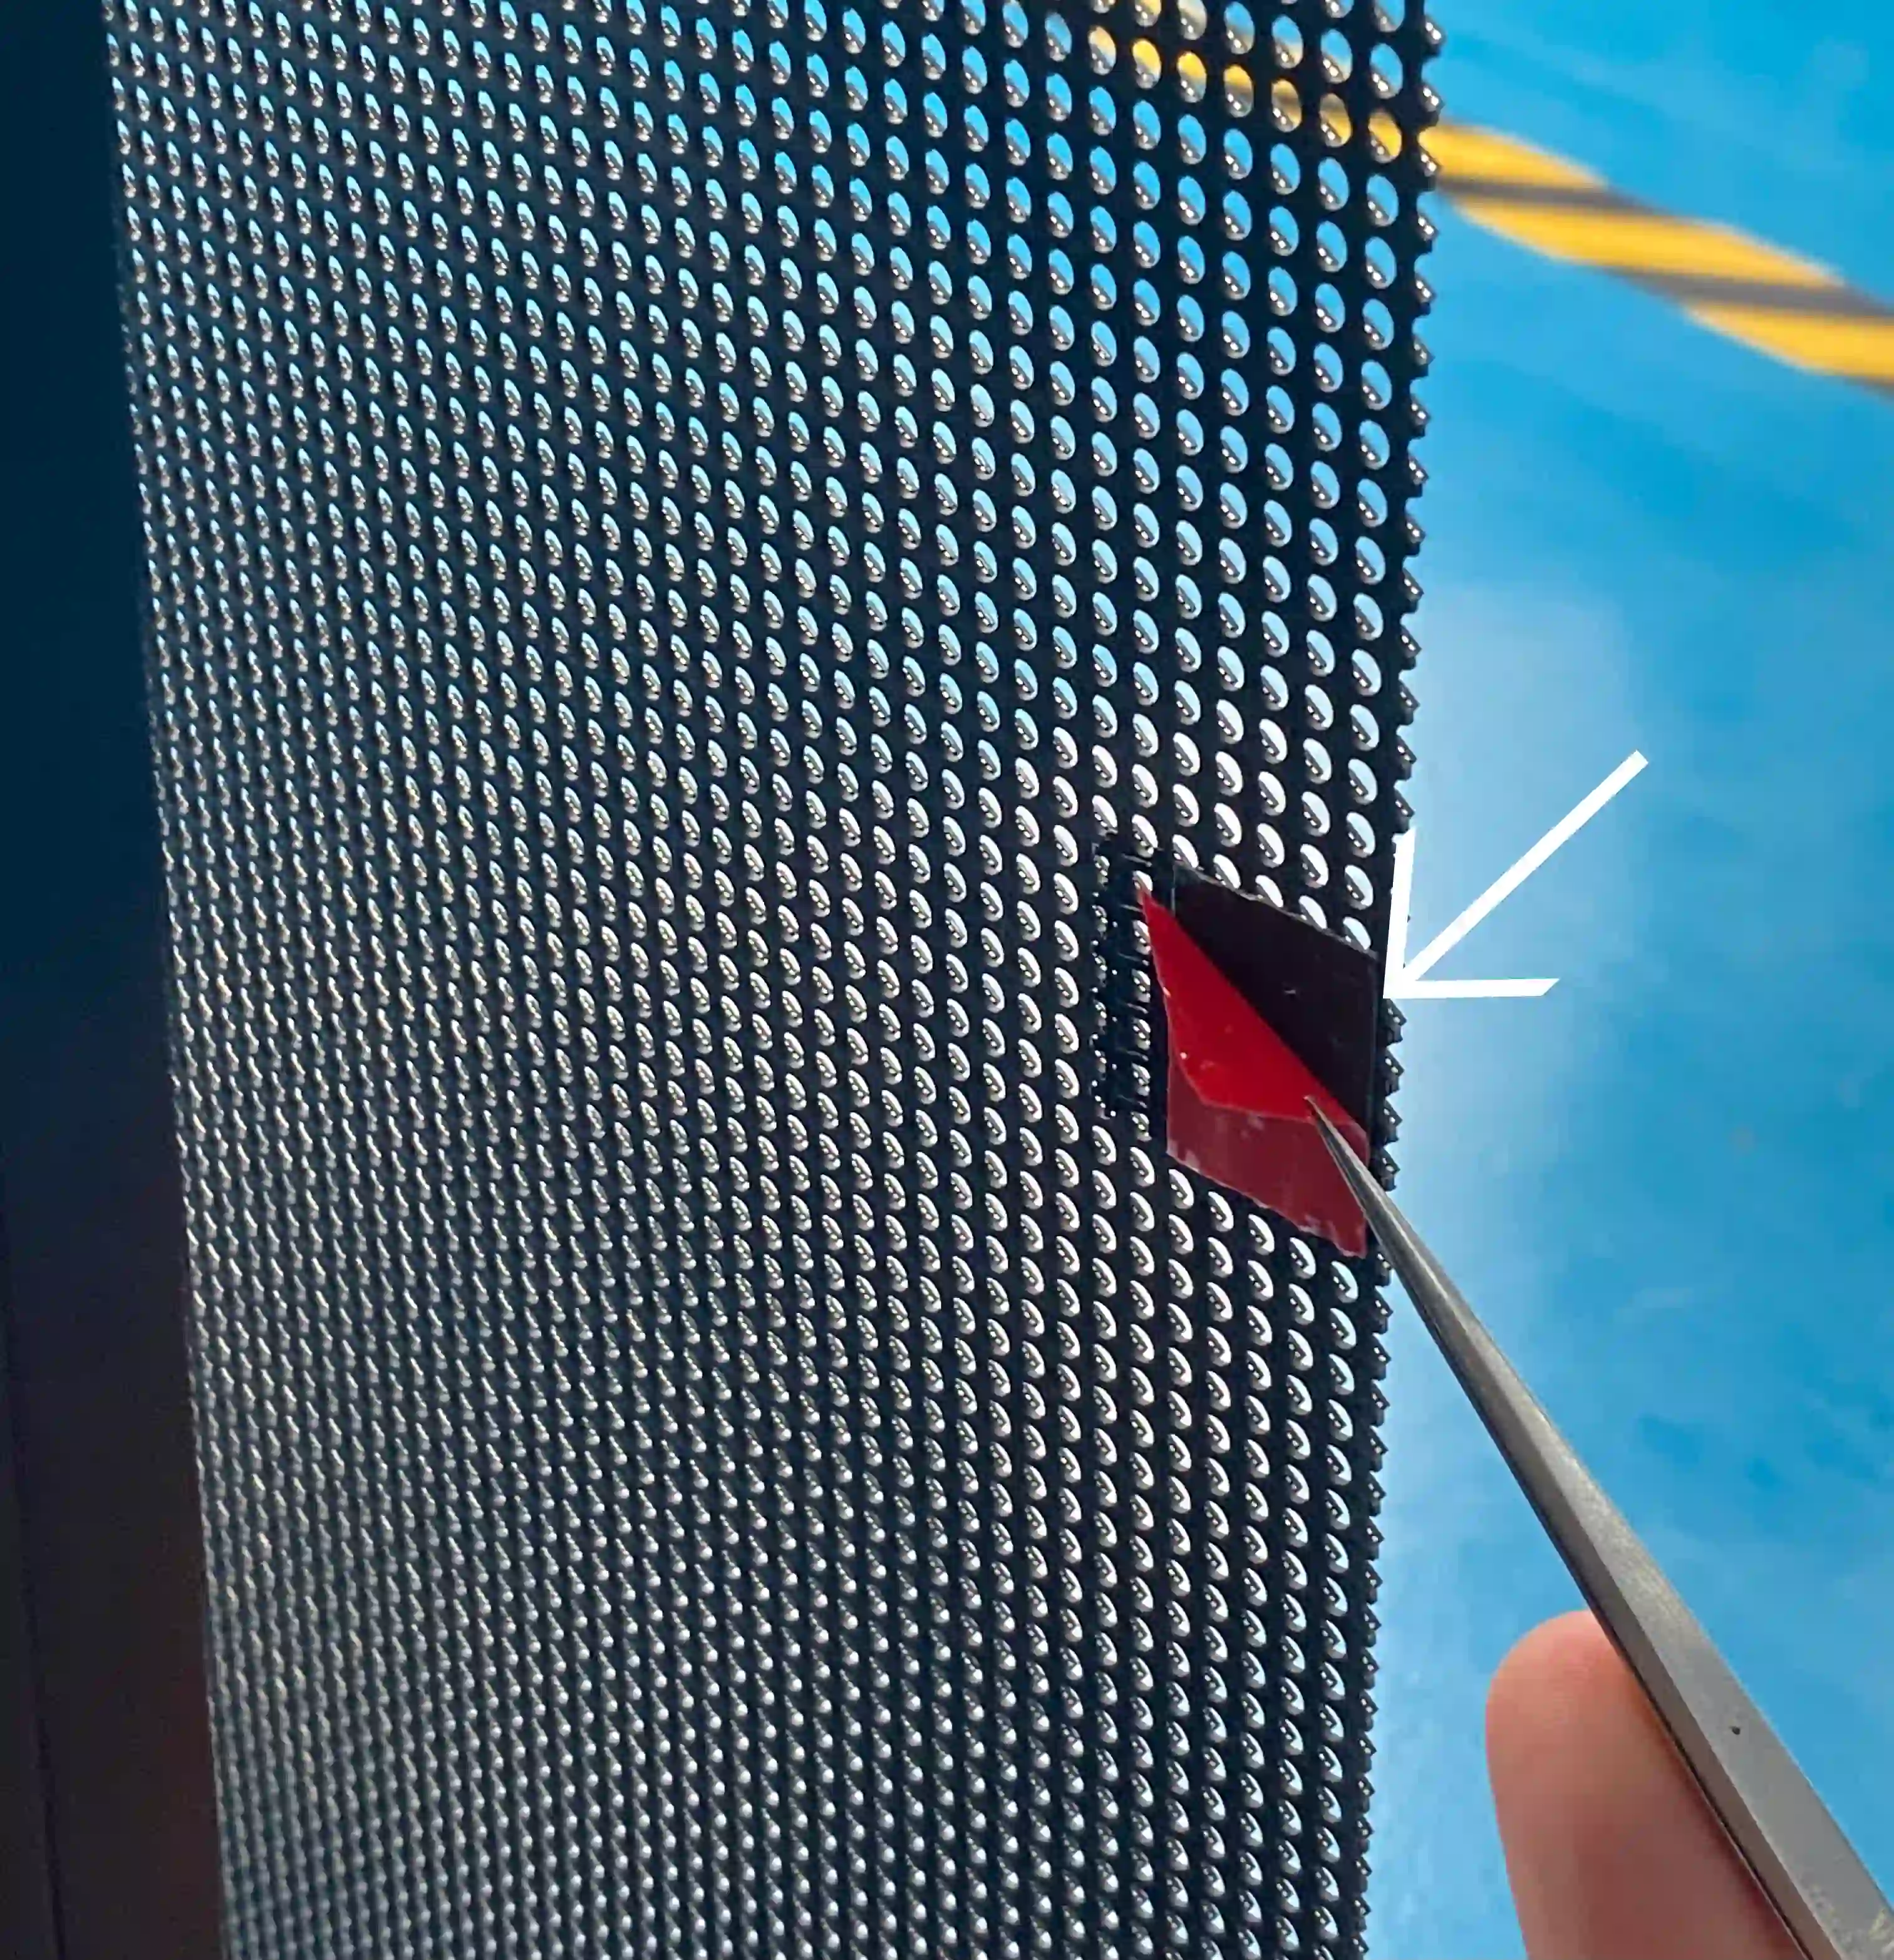
Step 8. Power On and Test
Perform a complete functional inspection. If any panel appears slightly misaligned, minor adjustments can usually be made by loosening the mounting screws and repositioning the panel.
After the system is powered on, the blue power indicator LED on each power box should illuminate. If the indicator does not light up:
- Verify that the AC power supply is connected correctly.
- Check all power cable connections inside the frame.
If part of the display flickers after power-on, the most common cause is an incomplete signal connection. Please check the LED panel connectors are firmly plugged into HUB sockets. In most cases, reseating the connectors will resolve the issue.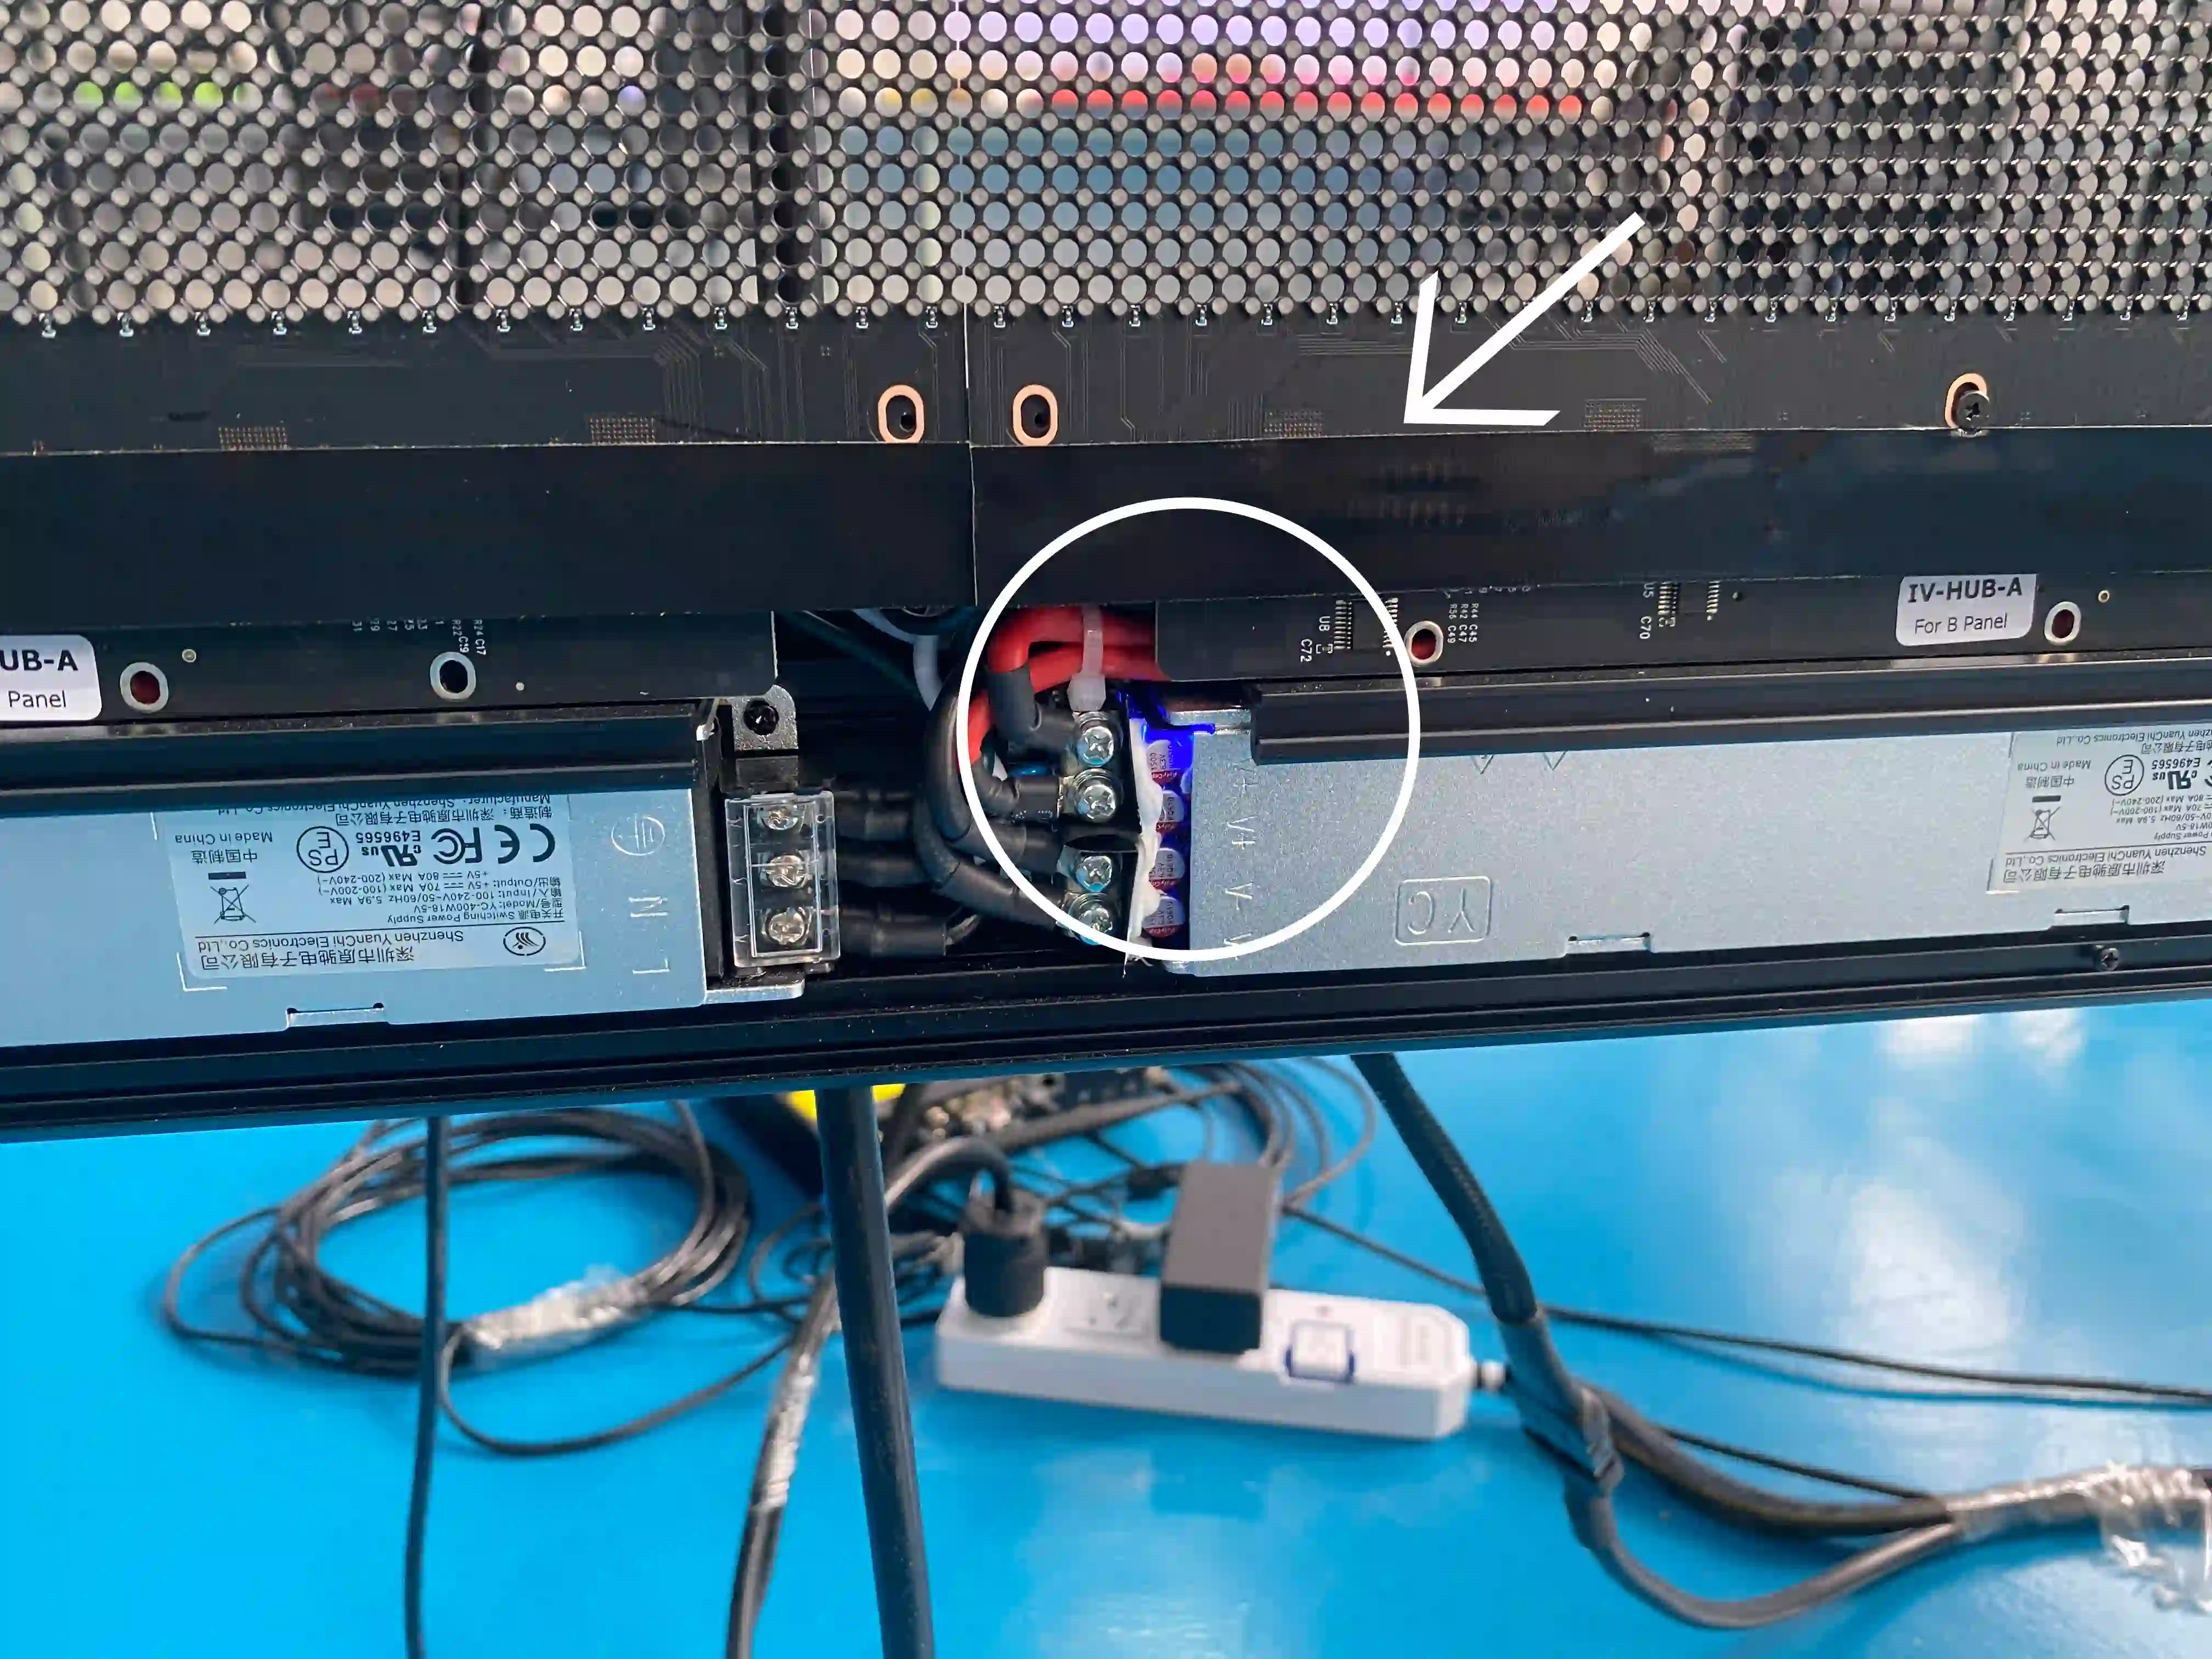
Step 9. Install the Front Covers and End Caps
Once all LED panels have been installed:
- Snap the front covers into place
- Tighten the retaining screws
- Install the decorative end caps
- Perform a final inspection
Your hanging holographic transparent LED poster is now mechanically complete.
Common Installation Mistakes to Avoid
Even experienced installers occasionally encounter these issues:
Uneven Frame Alignment
If the frame isn’t perfectly square, LED panels may not align correctly.
Solution: Adjust the corner brackets before tightening the frame completely.
Visible Gaps Between Panels
Small installation tolerances may create visible gaps.
Solution: Loosen the mounting screws slightly, reposition the panels, then retighten.
Incorrect Clip Orientation
Improper clip installation can affect electrical continuity.
Always confirm the clip direction before locking it into place.
Installation Safety Tips
To ensure safe installation:
- Always use at least two installers.
- Wear appropriate safety equipment when working at height.
- Never force LED panels into position.
- Avoid bending the transparent mesh panels.
- Disconnect power before disassemble LED panels.
Proper installation maximizes both safety and the lifespan of the display.
Why InVisia Hanging Holographic Transparent LED Displays Are Easier to Install
At InVisia Displays, installation efficiency is considered from the very beginning of product development.
Our hanging holographic transparent LED displays feature:
- Lightweight aluminum frame design for fast assembly
- Pre-labeled LED panels that eliminate wiring confusion and cuts setup time in half.
- Alignment pins for seamless visual performance
Whether you are setting up a temporary display for an exhibition, a rental stage, or a permanent retail storefront, our engineering makes the difference.
Conclusion
Installing a hanging holographic transparent LED screen is much simpler than you think. By following the correct installation sequence—from frame assembly and cable routing to LED panel installation and final alignment—you can achieve a clean, seamless display that delivers stunning floating visuals.
Looking for a customized hanging holographic transparent LED display? Contact InVisia Displays to explore our complete range of transparent LED posters, suspended LED displays, and tailor-made holographic LED solutions for retail, exhibitions, museums, and commercial spaces.

 5th Floor, Building 9, Hengchangrong High-Tech Industrial Park, Bao'an District, Shenzhen 518128, China